Certifying French runway surfaces
- Like
- Digg
- Del
- Tumblr
- VKontakte
- Buffer
- Love This
- Odnoklassniki
- Meneame
- Blogger
- Amazon
- Yahoo Mail
- Gmail
- AOL
- Newsvine
- HackerNews
- Evernote
- MySpace
- Mail.ru
- Viadeo
- Line
- Comments
- Yummly
- SMS
- Viber
- Telegram
- Subscribe
- Skype
- Facebook Messenger
- Kakao
- LiveJournal
- Yammer
- Edgar
- Fintel
- Mix
- Instapaper
- Copy Link
Posted: 6 December 2012 | Jonathan Gerthoffert, Programme Officer, Civil Aviation Technical Centre (France) | No comments yet
Certification of runway friction measuring devices is a strong commitment of the French State for the safety of aircraft operations. It ensures airport operators that devices meet the requirements in their ability to discriminate surfaces with different friction levels and their performances, and are consistent in terms of repeatability and reproducibility. It also makes measurements between different airports and service providers comparable, and ensures a uniform comprehension of the regulatory minimum friction level.
The International Civil Aviation Organisation (ICAO) standards require runways to be maintained to be able to provide good friction characteristics. Self-wetting continuous friction measuring equipment is the most widely used tool to measure runway surface characteristics. However, devicedependency of results and complexity of measuring systems require regular device quality controls. Since 2006, quality controls have been carried out by the French State as part of a certification process on friction measuring devices used for maintenance purposes.
Minimum friction level
Friction on wet runways can be significantly reduced due to many different causes such as; rubber deposits, sand, oil spillage, dust particles, jet fuel and weathering of aggregate. This is why ICAO standards require friction measurements on a regular basis to assess the evolution of runway surface characteristics to detect any change and to decide maintenance actions.
ICAO standards also require each State to specify minimum friction levels below which a runway can be considered as ‘slippery when wet’, meaning operations when wet are no longer safe. Below these minimum friction levels, corrective actions have to be taken. Self-wetting continuous friction measuring equipment is the most widely used tool to perform these measurements. ICAO therefore provides guidance to determine minimum friction levels for several friction measuring devices.
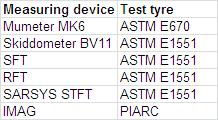

Table 1: The six types of devices for maintenance measurements
Since 2006, the French State1 has recognised six types of device for maintenance measurements. These devices are presented in Table 1. Every device used for the regulatory measurements on French airports has to be certified by the State. The Civil Aviation Technical Centre (Service Technique de l’Aviation Civile, (STAC)) is in charge of this certification.
Uniform comprehension
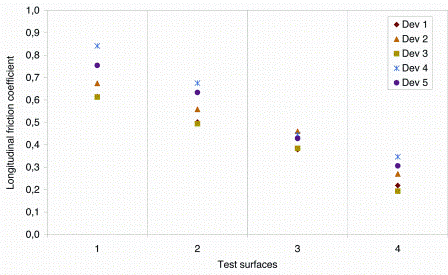

Figure 1: The results of five different devices on several test surfaces
Numerous types of devices can currently be found at airports. They have different functioning principles including; operating modes, water delivery systems, measuring tyres and inflated tyre pressures. These variables cause friction characteristics of runway to be both ‘surface’ and ‘device’ dependant. Figure 1 shows the results of five different devices on several test surfaces. The device dependency is obvious. Devices 1 and 3 are of the same type and Figure 1 shows that their results are extremely close.
Device dependency is a major issue when comparing friction measurements and determining the runway friction level. Therefore, there is a need for harmonising friction measure – ments to ensure a uniform comprehension, specifically of the regulatory minimum friction level between different airports and different service providers.
Several test programmes2-5 have been carried out to correlate friction measurements where good results have been achieved for maintenance measurements. The same con – clusions have not been achieved for operational measurements on snow or ice covered runways as yet. From these studies, it appears that every device can be experimentally correlated to each other. France has therefore chosen to correlate every device used for maintenance purposes to a device chosen as a reference, owned by STAC.
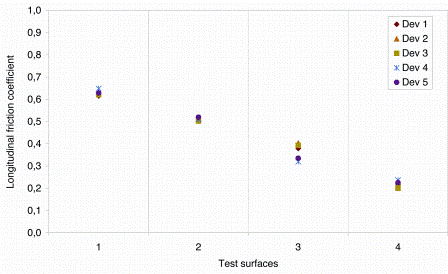

Figure 2: Friction results after correlating the devices in Figure 1
Figure 2 shows friction results after correlating the devices in Figure 1. It demonstrates the efficiency of this process to harmonise friction measurements.
The reference device
At the heart of the certification process is the reference device. It is a specific device chosen as a reference because numerous participations at international test campaigns (Tyre/runway friction workshop at NASA Wallops Flight Facility3 and the Joint Winter Runway Friction Measurement Programme5) demon – strated it is repeatable and can be correlated to other devices.
Causes for variability of the reference device have been extensively investigated. The consequences of small variations of tests parameters (tyre wear, pressure, speed, slip ratio, water thickness) on the results have been experimentally determined and tolerances on these parameters have been set up to reduce variability of the reference device measurements.
This work resulted in the development of rigorous calibration requirements for every part of the system including horizontal and vertical force and the wetting system. Thus, the error on the friction co-efficient from calibration should not exceed ± 0,04. The reference device is calibrated before and after each campaign to check that it did not drift during transportation or tests. It can only be used with its own dedicated towing vehicle and is only used for the certification of other devices.
According to ISO 170256, this work is in progress of accreditation which is relative to general requirements for the competence of testing and calibration laboratories. This will emphasise the quality of STAC’s work. A reference surface has been chosen to check that the reference device does not drift. Figure 3 presents the friction measurements on that reference surface over six years. Upper and lower limits have been determined from the variability study and the friction measurements of the reference device on that specific surface must not be out of these limits.
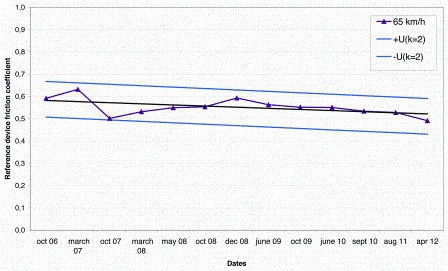

Figure 3: Friction measurements on the reference surface taken over six years
Certification campaigns
Certification campaigns consist in side-by-side comparisons between the candidate and the reference device. One to three annual campaigns are organised by STAC on the IFSTTAR6 site. The site has been specially designed for testing, calibration and certification of surface characteristics (texture and friction) measuring devices. It is divided into three parts: The first section is a 1,400m-long semi-circle used for acceleration, the second is 500m-long and includes a track zone with 11 test surfaces, and the last 400m-long section is used for deceleration.
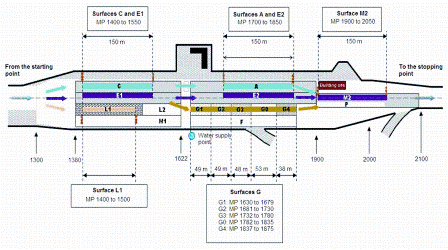

Figure 4: The disposition of test surfaces
Figure 4 shows the disposition of test surfaces. They are made of a great diversity of materials, combining high and low macro and micro texture, to cover a wide range of friction levels. Specific attention is paid to low friction surfaces, close to the minimum friction level, to check the ability of the candidate device to detect such surfaces.
Tests are performed at three speeds: 40, 65 and 95 km/h. To ensure the quality of data, partici – pants must achieve the following requirements:
- Test speeds have to be maintained at ± 5 km/h
- Equipment has to be mounted with a new and run tyre (participants must have a spare identical tyre in case of main tyre deterioration)
- The measuring wheel slip ratio must not exceed ±5 per cent of the nominal value
- The flow of the water delivering system must ensure a water film thickness of 1mm ±0.1mm.
The test operator is responsible for the quality of the measurements. They should be done again if;
- Test parameters are not held within tolerances listed above
- The participant veers off the centreline of the test surface
- The measuring wheel is in aquaplaning conditions
- Any event happening during friction measurements makes the test not conform to the operating mode of the participant
- There is any reason to question the measured value.
For each combination (participant, test surface, speed), a minimum of five valid repetitions is required.
Repetitions are needed to assess repeatability and reproducibility of the Continuous Friction Measuring Equipment (CFME) and control the quality of the measuring device.
The attention paid to the quality of data has resulted in lower variability of measurements and in higher stability of correlation from year to year. Figure 5 shows the results for one specific device over three years. It clearly demonstrates the stability of both devices over this period. This is a major outcome since one of the issues raised during the Joint Winter Runway Friction Measurement Programme5 was the variability of correlation constants from one year to the next one.
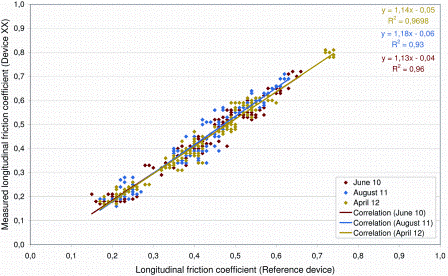

Figure 5: The results of one specific device over three years
Controlling the French self-wetting CFME fleet
This certification process set up in France allows regular control (every two years) of the French self-wetting continuous friction measuring equipment fleet.
After harmonising the friction results, measuring devices repeatability and re – producibility are determined. The statistical tool used for this analysis is the repeatability and reproducibility (R&r) gauge. It measures the amount of variation due to the measuring system and compares it to the total variation observed. The device is certified if this ratio is lower than 30 per cent, meaning that less than 30 per cent of the total variability is due to the device.
A device is therefore certified if it achieves the following conditions:
- It correlates to the reference device: the correlation is calculated using the least square method, the determination co – efficient (R²) is greater than 0.90
- It is repeatable and reproducible: R&r is lower than 30 per cent.
This device is then granted with a certificate which shows; reference of the device, name and address of the company, serial number of the device, relationship correlation constants, validity domain of the correlation constants, and regulatory minimum friction levels. This certificate has a two-year validity period.
Achievements
Since 2006, 22 devices have been tested for certification. Only three have been refused (14 per cent). The following observations have been made:
- On the first device, a stone blocked the nozzle, reducing the theoretical 1mm water film
- On the second device, the nozzle was bent and the water film was not directed to the front of the measuring wheel
- The last device was refused because of bad calibration of sensors. This device was sent back to the manufacturer to have its sensors replaced. Then device then reapplied for certification, met our criteria, and was certified.
Nine devices are currently certified for functional use: five IMAGs, two SARSYS STFTs and two ASFTs (Airport Surface Friction Testers).
Perspectives
Test methods and results analysis may still be improved. Thus, the control, through image processing techniques, of the vehicle trajectory when driving on the test surface would reduce the variability due to surface heterogeneity. The replacement of the linear correlation by an analytic model, based on the ESDU model8, could improve results analysis. STAC is still working on the reduction of measurements variability. Substantial advances have already been achieved in terms of quality and stability of the correlation, and even better results will be obtained from tougher criteria for both calibration and test parameters.
This improvement process is in-line with the on-going STAC accreditation according to the ISO 17025 standard7 relative to general requirements for the competence of testing and calibration laboratories. It will emphasise the quality of calibration and steady maintenance of the reference device, as well as the quality of testing procedures.
Similar needs have been brought to light concerning measurements on contaminated runways and the next step would be to extend certification to operational friction measuring devices.
References
1. Arrêté du 10 juillet 2006 relatif relative aux caractéristiques physiques des aérodromes civils utilisés par les aéronefs à voilure fixe, annexe technique n°1.
2. ICAO programme for correlating equipment used in measuring runway braking action – Results of correlating studies (1973).
3. Yager, T. J. (1994). First Annual Tyre/Runway Friction Workshop at NASA Wallops Flight Facility – Summary and proceedings document.
4. PIARC technical committee on surface characteristics C. 1 (1995). International PIARC experiment to compare and harmonise texture and skid resistance measurements.
5. Wambold, J. C., Henry, J. J. (2003), Joint Winter Runway Friction Measurement Programme – 2003 testing and data analysis.
6. Institut Français des Sciences et Technologies des Transports, de l’Aménagement et des Réseaux (French Institute of Sciences and Technologies of Transport, Planning and Networks).
7. ISO/IEC 17025:2005, General requirements for the competence of testing and calibration laboratories.
8. ESDU International plc. (2003). Development of a comprehensive method for modelling performance of aircraft tyres rolling or braking on dry and precipitationcontaminated runways.
About the author
Jonathan Gerthoffert has been working for the French Civil Aviation Technical Center since 2009 as the Head of the Runway Friction Research Programme. He has been involved in national standardisation groups and has been a member of the ICAO Friction Task Force since 2011.
Issue
Related topics
Related organisations
Civil Aviation Technical Centre, International Civil Aviation Organization (ICAO)


